Parting Thoughts on IKAWA PROV3
Let’s start with the apparent differences between the IKAWA and what most coffee roasters are accustomed to (drum roasters). My previous statement hints at a distinction: coffee roasting machines are typically classified into two categories. The delineation of these categories comes from the question of what is causing the mixing/agitation of the coffee during the roasting process to ensure even heat application.
The first category is mechanical agitation (which most people are familiar with from the perspective of production roasting). This category of coffee roasters (including drum roasters) uses mechanical means to stir, mix, and loft the coffee. This is frequently a roasting drum with paddles inside the drum chamber that cause the coffee to be mixed and lofted. Other roasters also use mechanical agitation, such as the Stronghold coffee roaster, despite a non-horizontally oriented drum. Another example of a roaster in this category that is often mischaracterized are Loring Coffee Roasters.
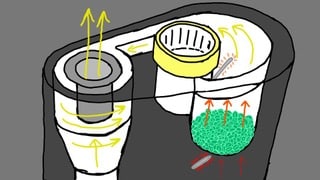
The second category of coffee roasters uses airflow (which causes the bean mass to act as a fluid and flow) to move and mix the coffee. These coffee roasters are predominately called fluidized bed coffee roasters (sometimes shortened to fluid beds). This category of roasters is intensely recognizable to people from a home-roasting background. Indeed, many who started on a popcorn popper, heat-gun/bowl combo, iRoast2, Fresh Roast, or Sonofresco are very familiar with this category of roasters. Production roasters may also be familiar with this category by using SIVITZ roasters, Coffee Crafters (or the like). The IKAWA is a fluid bed roaster. It is critical to understand that this category of roasters relies on REMARKABLY more airflow volumes than a mechanical-agitation roaster. When comparing the IKAWA with drum roasters from the perspective of airflow volume per gram of coffee (CFM/g), we can see that there is 6x the airflow in an IKAWA than a Loring s70 at 100%. This is significant and changes the way the coffee roasts. Additionally (at least in the case of the IKAWA), since all of the airflow is flowing up through the coffee, it also changes our expectations of the temperature readings.
Since, unlike a drum roasting system where some air bypasses any coffee, a fluidized bed roaster passes all of the airflow through the coffee mass, the bean mass absorbs more energy from the hot air flow. This means that while the inlet air temperature will remain the hottest temperature reading, as in a drum roaster, the exhaust air temperature and the bean temperature measurements will switch positions. Generally, in a drum roaster, the inlet air temperature is the hottest, followed by the exhaust air temperature (because so much of it bypasses coming into contact with the coffee), followed by the bean temperature. In the IKAWA, the bean temperature is the second hottest temperature reading, and the exhaust temperature tends to be the lowest. This runs contrary to my assumptions in the 2016 blog post but is the truth of my findings when I jury-rigged my IKAWA with a bean probe while building my courses.
The second important feature of how air flows through the roaster is that the considerable volume of air (relative to the grams of coffee) will force its will onto the coffee. This means that whatever natural path the coffee bean may take concerning the heat energy received will tend to be overwhelmed by the high volume of hot airflow. It’s hard for me to put into words completely, but I tended to see darker WB (whole bean) colors relative to GR (ground) colors when roasting on the IKAWA vs. a drum roaster because of that higher airflow. If I wanted to achieve a color spread similar to what I would expect of a drum roaster (while using inlet profiling), I had to use the minimum possible airflow after the first crack to keep the beans moving. Often, this is 60%, which represents the lowest possible setting for airflow on an IKAWA. A huge thank-you to Andrew and the IKAWA team for humoring me… when I turned it down even lower than 60% (with their help), I didn’t see any real benefit or return with the profiles I was using at the time, so though it still seems high… 60% appears to be just fine.
So, when considering the path and airflow volume through the machine, note that the theoretical bean temperature is situated somewhere between the exhaust and inlet curves. Also, starting with a higher airflow and moving toward a lower airflow setting (principally focusing on keeping the beans lofted) is recommended. I’ve tried roasting with a focus on keeping the absolute minimum airflow that I needed to keep the beans moving during the entirety of the roast… but this approach led to a lack of flexibility bean to bean as each bean’s shape, density, etc., really impacted its loft. I recommend starting around 80%, tapering to ~ 70%, and then down to 60% before the first crack.
When considering building profiles for the IKAWA, I would 100% recommend using inlet and not exhaust for the basis of your roasting. For one, it will not vary as greatly with airflow differences caused by altitude or minor differences in fan speed (essentially, it is more transferable). Also, since it doesn’t have to pass through the bean mass before measurement, it removes much of the lag for the PID and allows for a nicer “following” of the designed curve. With the exhaust curve controlling the roast, there is a high tendency for peaks and valleys with the inlet temperature curve, which causes a bit of a chaotic environment for the beans. Please check out my IKAWA 2.0 lesson on Vimeo on demand if you’d like to learn more about Inlet vs. Exhaust.
BUILDING MY NEW ROAST PROFILE
It’s no real surprise, then, that I followed many of these concepts when producing the roast profile, I am sharing with you today. I am using Inlet air temperature (since I feel it is superior to exhaust air), starting with higher airflow (80%) and dropping steadily to reach minimum airspeed about 1:00-1:30 minutes before the first crack. I have also planned this profile so I am reaching the maximum inlet temperature at about the same time as the minimum airflow volume. This is similar to how I often roast on a drum roaster (though not intentionally). I generally begin decreasing my power input as the first crack is on the horizon so I can enter it slowly enough to hit an appropriate development time without drifting too dark in roast color. From then on, the power steadily decreases until the roast’s end.
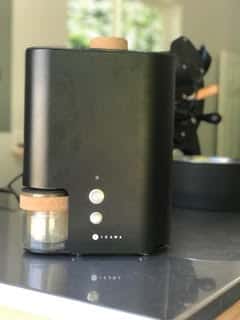
Remember, this profile is for an IKAWA Pro50 v3.
I am using 50 grams of coffee during the roast.
-
If you use less, it will roast faster (and likely darker).
-
If you use more, it will likely roast slower and lighter.
-
Highly recommend trying it with 50 grams 🙂
My test roasting is done primarily at 900 ft of elevation (~274 masl). I strongly believe that altitude should not impact roasting on the inlet, though it will change how the exhaust curve looks (but in my experience, the coffee coming out should be similar).
I have tested this with coffee from various regions with various processing methods and had decent results.
Up to now, I have tried it with:
-
Papua New Guinea
-
Colombia
-
Guatemala
-
Kenya
I want to reiterate something I mentioned earlier in the post and make it bold so it doesn’t go unnoticed. There is no such thing as a one-size-fits-all profile for roasting coffee. Every roast profile will need minor tweaks and adjustments to get the most out of the coffee you’re roasting.
HOW I AM USING THIS PROFILE